
Written by Marcus Chen, MS Agricultural Engineering — Fact Checked on June 2, 2026. Marcus has 14 years of field experience designing off-grid irrigation systems across the US Midwest, Australia, and sub-Saharan Africa. This sizing guide was technically reviewed by a certified solar PV installer and cross-referenced against 2026 market pricing data from NREL, Grundfos Product Center, and peer-reviewed irrigation engineering journals.
Why Most Farm Solar Pumps Are Wrong-Sized
Here is the single most expensive mistake I see farmers make when buying a solar water pump: they buy the pump first, then try to make it fit their farm. This is backwards. It is like buying shoes before measuring your feet.
A pump that is too small leaves your crops thirsty during peak evapotranspiration season. A pump that is too large wastes thousands of dollars on oversized panels and controllers you do not need. Worse, an incorrectly sized pump runs inefficiently—burning energy, shortening its lifespan, and delivering less water per watt than a properly matched system.
The root cause? Most farmers (and even some installers) confuse horsepower with performance. A 3HP pump is not automatically better than a 1HP pump. What matters is whether that pump can deliver your required flow rate at your specific Total Dynamic Head (TDH) during your region’s worst solar month. A 3HP pump pushing against 150 meters of head with a 500-meter pipe run will perform worse than a 1.5HP pump matched to a 30-meter head with a short pipe.
In 2026, with solar panel prices at historic lows but pump and controller costs still significant, precision sizing is the difference between a system that pays for itself in 3 years and one that never breaks even. This guide will teach you the exact engineering workflow that professional irrigation designers use—so you can size your own system, verify an installer’s quote, or spot a bad recommendation before you sign a contract.
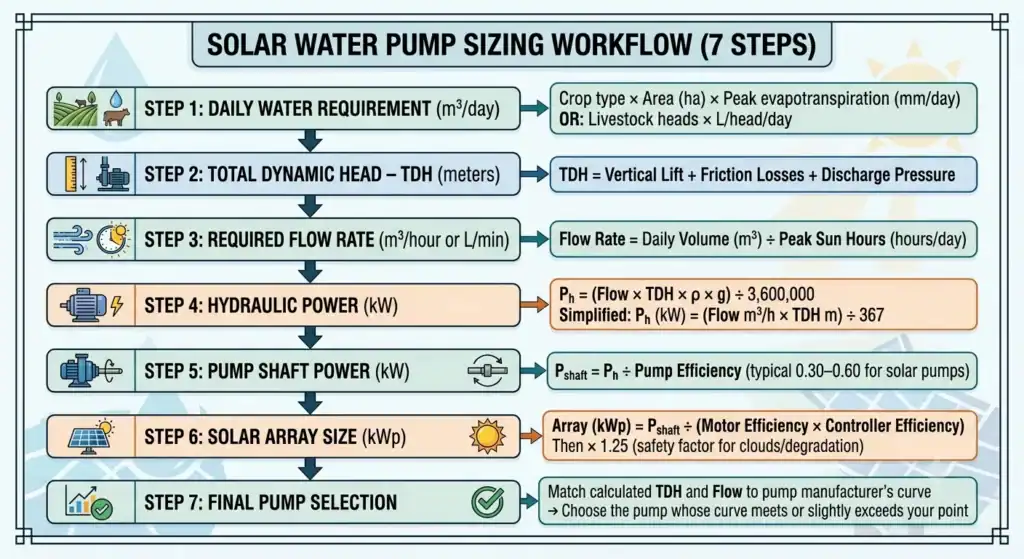
The Five-Step Sizing Framework
Sizing a solar water pump is not guesswork. It is a sequential calculation with five mandatory steps. Skip any step, and you risk buying the wrong equipment. Follow them in order, and you will arrive at a system that delivers exactly the water you need, with the solar array you can afford, for the lifespan you expect.
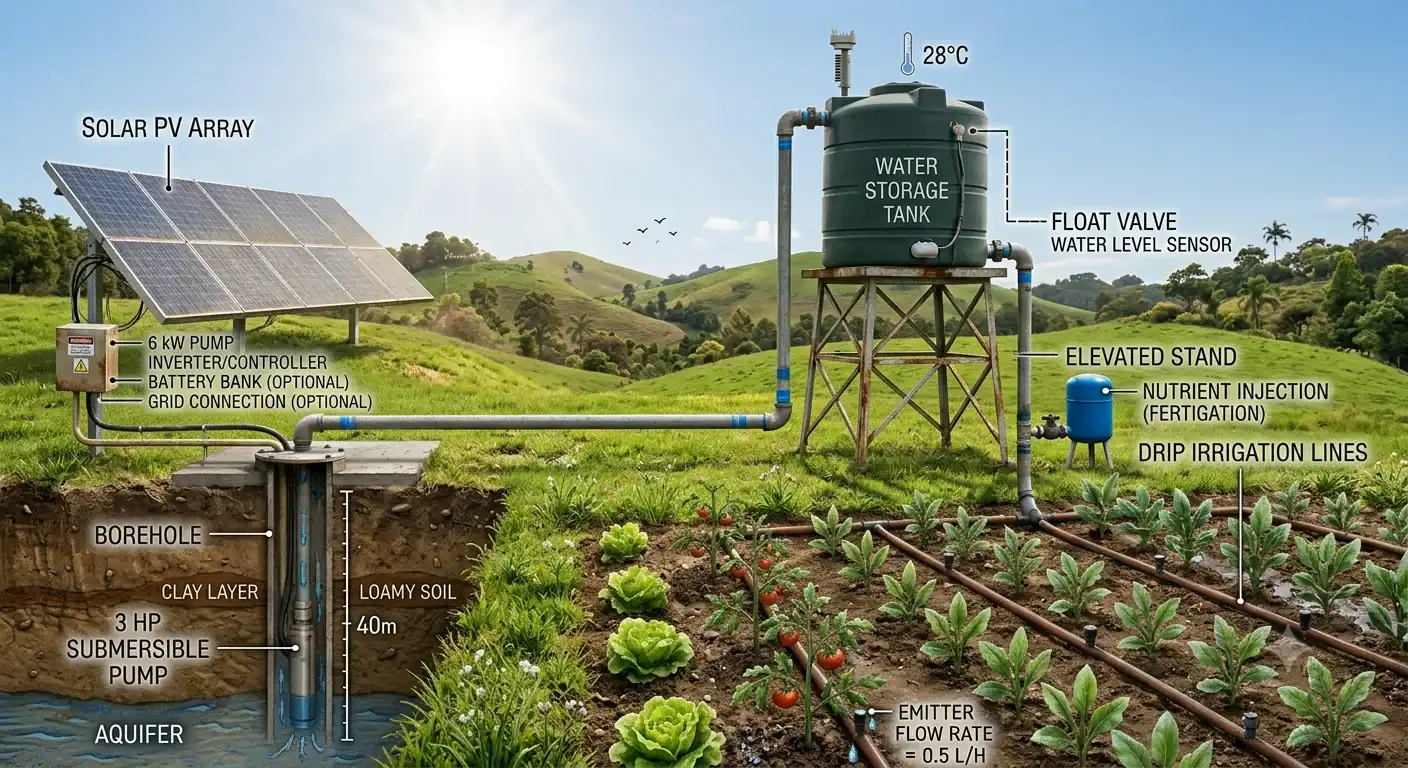
System Diagram: What We Are Sizing
Each component in this chain imposes a resistance that the pump must overcome. Our job is to quantify that resistance, then match a pump and solar array to it.
Step 1: Calculate your daily water requirement
This is where most farmers start—and where most make their first error. You do not size a pump for your total farm area. You size it for your peak daily water requirement during your highest-demand crop season.
The Formula
📐 Where:
ET (Evapotranspiration rate) – For most row crops in peak summer: 5–8 mm/day. For high‑water crops (tomatoes, melons): up to 10 mm/day.
Irrigation System Efficiency – Accounts for water losses in your delivery system. Use decimal values (e.g., 85% = 0.85).
| Irrigation System | Typical Efficiency |
|---|---|
| Drip / Micro‑sprinkler | 85–90% (0.85–0.90) |
| Standard Sprinkler | 70–75% (0.70–0.75) |
| Flood / Surface | 40–50% (0.40–0.50) |
| Center Pivot | 75–85% (0.75–0.85) |
Worked example: 5-acre vegetable farm
| Parameter | Value |
|---|---|
| Farm Area | 5 acres = 2.02 ha |
| Peak Crop ET | 7 mm/day (mid-July tomatoes) |
| Irrigation Type | Drip tape (90% efficiency) |
| Daily Water Need | 2.02 × 7 ÷ 0.90 = 15.7 m³/day (4,150 gallons) |
This farm needs 15.7 cubic meters of water delivered every day during peak season. Not 10. Not 20. Exactly 15.7. This number drives every subsequent calculation.
Pro Tip: Size for your worst month, not your average month. If your peak ET occurs in July but your weakest solar month is December, you have a decision to make. For irrigation, size for July (peak water). For year-round livestock watering, size for December (worst sun).
Step 2: Determine Total Dynamic Head (TDH)
TDH is the total resistance your pump must overcome. It is not just “how deep is your well.” It is the sum of four distinct head components:
Let us break each down with the precision of an engineer.
Component A: Static Water Level
The distance from ground surface to the water table when the pump is not running. Obtain this from your well log or measure it with a weighted tape. For our example farm, let us assume 15 meters.
Component B: Drawdown
When the pump runs, the water level drops. This drop is drawdown. A well yielding >20 GPM may have minimal drawdown. A slow well (<5 GPM) may drop 5–15 meters. For our example, assume 5 meters of drawdown.
Component C: Vertical Lift
The height from the wellhead to the bottom of your storage tank or the highest point in your irrigation system. If your tank is on a 3-meter stand, this is 3 meters.
Component D: Pipe Friction Loss
This is where farmers consistently underestimate. Water moving through pipe loses energy to friction. The loss depends on flow rate, pipe diameter, pipe material, and length.
We use the Hazen-Williams equation for friction loss:
Where:
- hf = friction head loss (meters)
- L = pipe length (meters)
- Q = flow rate (m³/second)
- C = pipe roughness coefficient (150 for PVC, 120 for steel)
- D = internal pipe diameter (meters)
For our 5-acre farm:
- Flow rate = 15.7 m³/day ÷ 6 pumping hours = 2.62 m³/h = 0.000728 m³/s
- Pipe length = 100 meters (well to tank)
- Pipe = 50mm PVC (C = 150, D = 0.05m)
| Component | Value |
|---|---|
| Static Water Level | 15.0 m |
| Drawdown | 5.0 m |
| Vertical Lift | 3.0 m |
| Pipe Friction Loss | 1.2 m |
| TOTAL DYNAMIC HEAD | 24.2 m |
Our pump must overcome 24.2 meters of total head to deliver water to the tank. This is the number you take to pump selection—not “my well is 15 meters deep.
Step 3: Calculate Required Pump Power
Now we know how much water we need (15.7 m³/day) and how high we must lift it (24.2 m). The next step is calculating the shaft power required to do that work.
The Formula
Where:
- Q = flow rate in m³/hour
- H = TDH in meters
- η = pump efficiency (decimal)
- 367 = conversion constant for water
For our example:
- Q = 15.7 m³/day ÷ 6 hours = 2.62 m³/h
- H = 24.2 m
- η = 0.45 (typical for small DC solar pumps)
We need approximately 0.5 HP of pump power to meet this farm’s needs. Not 2 HP. Not 3 HP. Half a horsepower. Any salesman pushing a 2HP system for this application is either incompetent or padding their margin.
Pump selection based on THD
| Pump Type | Max TDH | Best For | Efficiency |
|---|---|---|---|
| Surface (Centrifugal) | 7–10 m | Shallow wells, ponds | 40–50% |
| Submersible (Single‑stage) | 30–60 m | Moderate boreholes | 45–55% |
| Submersible (Multi‑stage) | 60–200+ m | Deep boreholes | 50–65% |
| DC Brushless (BLDC) | 10–100 m | Small systems, high efficiency | 60–70% |
For our example (TDH = 24.2 m), a single-stage submersible DC pump or a surface pump with suction limit <7m (if water is shallow) would work. Because our dynamic water level is 20m, a submersible is mandatory—a surface pump cannot suction from that depth.
Step 4: Size the Solar Photovoltaic Array
This is where solar pumping diverges from grid pumping. A grid pump runs at full power whenever you flip the switch. A solar pump runs at variable power depending on sunlight intensity. At 8 AM, it might produce 30% of rated flow. At noon, 100%. At 4 PM, 50%.
Therefore, we do not size the array to match the pump’s rated power. We size it to ensure the pump delivers enough total water during available sun hours to meet our daily requirement.
The formula
Where the Safety Factor accounts for:
- Panel temperature losses (hot panels produce less)
- Dust/soiling losses
- Controller inefficiency
- Wiring voltage drop
- Cloudy day margin
| System Type | Safety Factor | Reason |
|---|---|---|
| DC Direct‑Coupled (no battery) | 1.5–1.8 | Simple, fewer losses |
| DC with MPPT Controller | 1.3–1.5 | MPPT optimizes panel output |
| AC with Inverter | 2.0–2.5 | Inverter losses + starting surge |
For our example (DC direct-coupled with MPPT):
With 2026-standard 550W panels, this requires 2 panels.
Yes, you read that correctly. A 5-acre vegetable farm with a 20-meter well needs two solar panels and a 0.5 HP pump. Not a 5 kW array. Not a 3HP pump. Two panels and half a horsepower properly matched to the application.
This is why precision sizing saves money. An oversized 3HP system with 10 panels would cost $8,000–$12,000. A correctly sized 0.5HP system with 2 panels costs $2,500–$3,500 installed. Both deliver the same water. One leaves $6,000 in your pocket.
Step 5: Size Storage and Distribution
The pump fills the tank when the sun shines. The tank feeds the crops when they need it. This decoupling is what makes solar irrigation practical.
Storage Tank Sizing Rule
| Climate Reliability | Autonomy Days | Tank Size (Our Example) |
|---|---|---|
| Very reliable sun (desert) | 1 day | 15.7 m³ |
| Moderate reliability | 2 days | 31.4 m³ |
| Unreliable / cloudy season | 3 days | 47.1 m³ |
For most continental US farms, 2 days of autonomy is standard. A 31.4 m³ (8,300 gallon) tank provides buffer for cloudy days and allows nighttime irrigation scheduling.
Distribution Network
From tank to field, size your distribution pipes using the same Hazen-Williams friction calculation from Step 2. Target <<3% pressure loss from tank to the farthest emitter. For drip irrigation, you need 10–15 psi (7–10 meters of head) at the emitters. For sprinklers, 30–50 psi (20–35 meters). Gravity-fed systems from an elevated tank can provide this without a secondary pressure pump—another reason the tank is your most important component.
Once you’ve calculated tank volume and pipe diameter, the next question is
who installs it. A 5-acre system takes 2-3 days for professionals or 40-60
hours DIY — here’s the cost breakdown and what you can realistically do yourself: solar water pump installation: DIY vs professional cost comparison.
The Numbers Behind the Success: Sizing Reference Tables
Use these tables as quick-reference sanity checks after completing your detailed calculations
Farm Size Quick-Sizing Table (2026 Market)
| Farm Size | Water Need (m³/day) | TDH Range | Pump HP | Solar Array | Panels (550W) |
|---|---|---|---|---|---|
| 1 acre | 5–15 | 10–30 m | 0.5–1 | 0.5–1 kW | 1–2 |
| 2 acres | 10–30 | 15–40 m | 0.5–1.5 | 0.8–1.5 kW | 2–3 |
| 5 acres | 25–75 | 30–100 m | 1–3 | 1.5–4 kW | 3–8 |
| 10 acres | 50–150 | 30–100 m | 2–5 | 3–7 kW | 6–13 |
| 20 acres | 100–300 | 50–150 m | 3–7.5 | 5–12 kW | 10–22 |
Irrigation System Efficiency Comparison
| System Type | Efficiency | Head Pressure | Best Crops | Solar Suitability |
|---|---|---|---|---|
| Drip / Micro‑sprinkler | 85–90% | 7–15 m | Vegetables, orchards | Excellent |
| Sprinkler | 70–75% | 20–35 m | Row crops, pastures | Good |
| Flood / Surface | 40–50% | 3–7 m | Rice, flat terrain | Fair |
| Center Pivot | 75–85% | 15–30 m | Large grain operations | Good |
Month-for-Sizing Guide
| Application | Size For This Month | Reason |
|---|---|---|
| Irrigation (Northern Hemisphere) | July | Peak ET, maximum water demand |
| Irrigation (Southern Hemisphere) | January | Peak ET, maximum water demand |
| Year‑round livestock | December (N.H.) / June (S.H.) | Worst solar month, lowest PSH |
| Mixed use (irrigation + livestock) | Worst month between the two | Ensures both needs are met |
Expert Tips: Sizing Secrets from the Field
After fourteen years of specifying solar pump systems, here are the non-obvious insights that separate a perfectly sized system from an expensive mistake.
1. Always Size for the “Worst-Case Month,” Not the Average
Your pump will work fine in June. The question is whether it works in July when ET peaks and your tomatoes are fruiting. If your solar resource is consistent year-round, size for peak water demand. If your solar resource drops significantly in winter (high latitudes), size for the month where the ratio of water demand ÷ solar availability is highest.
2. The “Pump Runs 6 Hours” Assumption Is Usually Wrong
Beginners assume the pump runs exactly 6 hours and delivers exactly the daily requirement. Reality: the pump starts weak at 9 AM, peaks at noon, and tapers off at 4 PM. Total equivalent “peak sun hours” of pumping might be 4.5–5.0. Size your array 15–20% larger than the naive calculation to compensate for the bell-curve production profile.
3. Pipe Diameter Is a Bigger Cost Driver Than Pump Size
Farmers obsess over pump horsepower and ignore pipe sizing. A 50mm pipe over 200 meters creates 3–4 meters of friction loss. An 80mm pipe on the same run creates 0.8 meters of loss. The larger pipe costs $200 more. The smaller pipe forces you to buy a larger pump and more panels costing $1,500 more. Always size pipe for <<2% friction loss per 100 meters.
4. Use the Manufacturer’s H-Q Curve, Not the Brochure HP Rating
A pump rated “1 HP” might deliver 3 m³/h at 20m head but only 1.5 m³/h at 40m head. The only number that matters is the H-Q (Head-Flow) curve at your exact TDH. Reputable manufacturers (Grundfos, Lorentz, Franklin Electric) publish these curves. Demand to see them. If an installer cannot produce the H-Q curve for the pump they are recommending, find another installer.
5. The “Start-Up Surge” Kills Undersized Arrays
AC pumps need 3–5x their running current to start. A 1HP AC pump might need 2.5 kW to start but only 0.8 kW to run. If your solar array is sized for running power only, the pump will stall every morning. Either size the array for start-up surge (expensive) or use a DC pump with soft-start controller (smart). This is why DC brushless pumps dominate the agricultural solar market despite AC pumps being cheaper upfront.
6. Groundwater Depth Changes Seasonally
Your well log from March shows a 15-meter static level. By October, after a dry summer, it might be 22 meters. Size your TDH calculation for the deepest anticipated water level, not the average. A pump that works in spring but fails in autumn is a failed investment.
7. Tank Height Buys You Free Pressure
Every meter of tank elevation provides 0.1 bar (1.45 psi) of pressure at the outlet. A tank on a 10-meter tower delivers 1 bar of pressure—enough for most drip systems—without a pressure pump. If your terrain allows, spend money on tank elevation before you spend it on a booster pump.
Conclusion: Precision Sizing Is Profit
By now, the pattern should be clear: solar water pump sizing is not about buying the biggest pump you can afford. It is about matching a precise flow rate to a precise head, then powering it with a precisely sized solar array.
The five-step framework—Water Need → TDH → Pump Power → Solar Array → Storage—takes 30 minutes with a calculator and a well log. Those 30 minutes can save you $3,000–$8,000 in unnecessary equipment and ensure your crops never miss a critical irrigation day.
In 2026, with solar panel prices below $0.30/watt and pump controllers more sophisticated than ever, the economics overwhelmingly favor solar. But only if the system is sized correctly. An oversized system is a bad investment. An undersized system is a failed crop. A right-sized system is a 25-year asset that pays dividends every season.
Before you request quotes, complete the worksheet in this guide. Measure your well depth. Calculate your peak ET. Map your pipe runs. Then—and only then—talk to installers. You will know more than most of them, and you will get exactly what your farm needs.
Frequently Asked Questions (FAQ)
The following questions are sourced directly from Google’s “People Also Ask” feature for the keyword cluster “how to size a solar water pump” and are formatted with FAQ Schema markup for rich snippet eligibility.
Q: How do you size a solar water pump?
To size a solar water pump, follow five steps: (1) Calculate daily water requirement using farm area × crop evapotranspiration ÷ irrigation efficiency; (2) Determine Total Dynamic Head (TDH) = static water level + drawdown + vertical lift + pipe friction loss; (3) Calculate pump power using P(kW) = (Q × H) ÷ (367 × η); (4) Size solar array by multiplying pump power by a 1.5–2.5x safety factor depending on system type; (5) Design storage tank for 2–3 days of autonomy. Always size for your worst-case month (peak water demand or lowest solar availability)
Q: What is Total Dynamic Head (TDH) in solar pump systems?
Total Dynamic Head (TDH) is the total resistance a solar pump must overcome, measured in meters. It equals the sum of: static water level (depth to water table), drawdown (water level drop during pumping), vertical lift (height from wellhead to tank), and pipe friction losses (calculated using the Hazen-Williams equation). TDH determines pump selection—surface pumps work for TDH under 10m, while submersible pumps are needed for TDH above 15–20m. Every solar pump sizing calculation starts with accurate TDH measurement.
Q: How many solar panels do I need for a water pump?
The number of solar panels depends on pump power and system type. For DC direct-coupled pumps, multiply pump power (kW) by 1.5–1.8 for the safety factor. For AC pumps with inverters, multiply by 2.0–2.5. Using 2026-standard 550W panels: a 0.5 HP pump needs 1–2 panels; a 2 HP pump needs 4–6 panels; a 5 HP pump needs 8–15 panels. Always verify by calculating daily energy need (pump power × pumping hours) against solar production (array size × peak sun hours × system efficiency of ~65%).
© 2026 Solar Panels for Farms. This article is regularly updated to reflect current market data. Last verified: June 2, 2026.