Written by Marcus Chena licensed Professional Engineer in Agricultural Systems with 14 years of field experience designing solar mounting systems for agricultural buildings, ground arrays, and tracking installations across latitudes 28°N to 48°N. He holds an M.S. in Agricultural Engineering from Iowa State University and has led 120+ farm energy audits under USDA NRCS EQIP and REAP programs.
The $180 August Electric Bill
In August 2024, I visited a 12-acre diversified farm near Fresno, California. The owner, Maria, was in the middle of peach season. She had invested in a 10-tray commercial electric dehydrator to process seconds and windfalls into dried fruit for farmers market sales. The dehydrator ran 14 hours per day, 6 days per week, drawing 1,200 watts continuously. Her August electric bill showed an extra $182 just for the dehydrator. Over a 3-month stone fruit season, she would spend $540 to remove water from fruit she was already selling at a discount.
Maria had tried sun-drying on screens the previous year. The peaches turned leathery on the outside but molded inside. Flies were a constant battle. And a single afternoon thunderstorm had ruined a full day’s harvest.
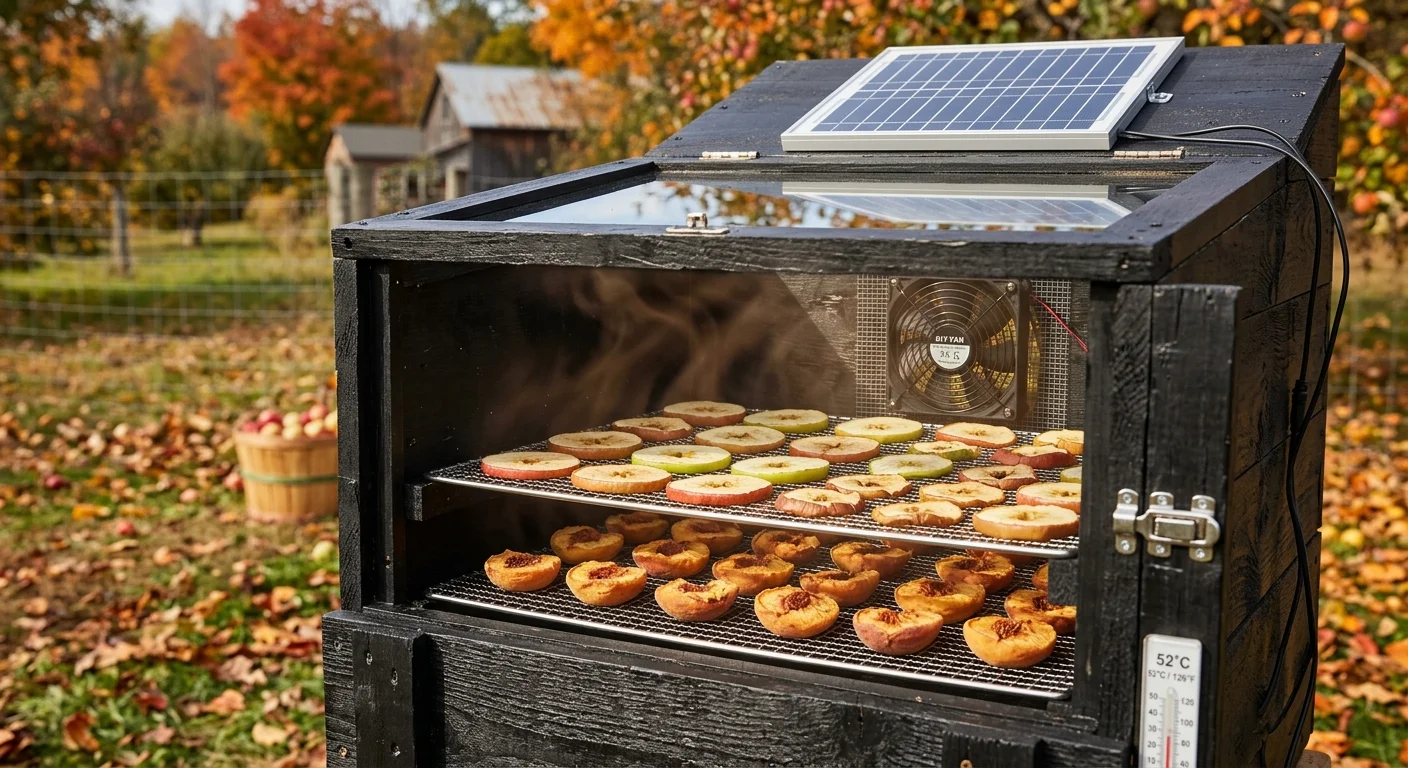
We built a solar convection dehydrator in one afternoon: a 4×2 foot plywood box painted black inside, insulated with rigid foam, covered with a sloped polycarbonate lid at 35°, and ventilated by a 12V DC computer fan powered by a 20W solar panel. The fan pulled fresh air through screened vents at the bottom, moved it across the fruit trays, and exhausted humid air through a vent at the top. Internal temperature on a sunny August day: 125–140°F. Perfect for fruit.
Maria dried 40 pounds of peach slices per batch (2 days in full sun). She ran 4 batches per week. Her electric dehydrator sat unplugged. Her August electric bill dropped by $182. The dehydrator cost $140 in materials. It paid for itself in 23 days.
Here is the math and the method.
The CFM-per-Tray Rule (Simplified)
Dehydrator Airflow Requirements – Farm Solar Guide
| Dehydrator Size | Tray Area | Fan CFM Needed | Panel Watts | Batch Capacity (lbs) | Drying Time (hrs) |
|---|---|---|---|---|---|
| 2×2 ft | 4 sq ft | 15–20 | 10W | 8–10 | 24–36 |
| 4×2 ft | 8 sq ft | 30–40 | 20W | 20–25 | 24–36 |
| 4×4 ft | 16 sq ft | 60–80 | 40W | 40–50 | 24–36 |
| 8×4 ft (tunnel) | 32 sq ft | 120–160 | 80W | 80–100 | 18–30 |
The rule: You need 4–5 CFM per square foot of tray area to prevent moisture buildup. Less airflow = mold. More airflow = faster drying but higher fan load.
Temperature by crop:
| Crop | Target Temp | Humidity (exhaust) | Drying Time | Notes |
|---|---|---|---|---|
| Apples | 130–140°F | < 40% | 6–10 hrs | Dip in lemon juice to prevent browning |
| Peaches | 125–135°F | < 35% | 8–14 hrs | Halve and pit; skin on or off |
| Tomatoes | 135–145°F | < 30% | 10–18 hrs | Halve cherry tomatoes; quarter slicers |
| Herbs (leafy) | 95–105°F | < 50% | 2–4 hrs | Low temp preserves volatile oils |
| Beef jerky | 145–160°F | < 25% | 4–8 hrs | Thin strips; marinate 12 hrs first |
| Peppers | 125–135°F | < 40% | 8–12 hrs | Halve and seed; wear gloves |
Four Drying Strategies
Option 1: Electric Countertop Dehydrator
| Metric | Value |
|---|---|
| Upfront cost | $150–$400 |
| Power draw | 600–1,500W |
| Monthly cost (daily use) | $120–$180 |
| Best for | Small batches, rainy climates, precise control |
Drawback: Expensive to run. Limited capacity (5–10 lbs). Adds heat to your kitchen in August.
Option 2: Oven Drying
| Metric | Value |
|---|---|
| Upfront cost | $0 |
| Power draw | 2,000–4,000W |
| Capacity | 2–4 lbs per batch |
| Best for | ⚠️ Nothing. Inefficient and ties up your oven. |
Drawback: Ovens cycle temperature ±20°F, scorching edges while centers stay moist. And you cannot cook dinner while drying peaches.
Option 3: Passive Solar Dehydrator (No Fan)
| Metric | Value |
|---|---|
| Upfront cost | $60–$100 |
| Airflow | Passive convection only |
| Best for | Very dry climates (Arizona, Utah) |
Drawback: In humid climates (Midwest, Southeast), passive airflow is insufficient. Mold risk is high. Drying times double.
Option 4: Active Solar Convection Dehydrator (Recommended)
The win: The 12V fan forces humid air out, preventing mold even in 70% ambient humidity. The solar panel runs the fan only when the sun is shining — exactly when drying is happening.
| Metric | Value |
|---|---|
| Upfront cost | $120–$250 |
| Power draw | 5–15W (12V DC fan only) |
| Operating cost | $0 |
| Best for | All climates with 4+ hours of sun during harvest |
The 8-Step Build Method
Tools Needed
- Circular saw or jigsaw
- Cordless drill
- Staple gun (for screen)
- Caulk gun
- Paintbrush
- Helper
Steps
- Build the box. Cut 3/4-inch plywood or exterior-grade OSB into a box: 48 inches wide, 24 inches deep, 18 inches tall at the back, 12 inches tall at the front (for a sloped lid). This 6-inch drop creates the solar angle and natural chimney effect.
- Insulate the base and back. Glue 1-inch rigid foam insulation to the bottom and back interior. Paint all interior surfaces with flat black high-heat paint (BBQ paint). Black absorbs solar radiation; insulation keeps heat inside.
- Install intake vents. Cut two 4×12 inch openings in the bottom front. Cover with aluminum window screen (keeps insects out). These are your fresh air intakes.
- Build the tray frame. Install 1×2 inch wood cleats on the side walls every 3 inches vertically. This allows adjustable tray spacing. Make 4–6 trays from 1×2 frames stapled with stainless steel mesh (1/4-inch grid). Do not use galvanized screen — it rusts from fruit acid.
- Install the exhaust vent. Cut a 6-inch diameter hole in the top back. Mount a 6-inch dryer vent with a flap that opens outward. The flap prevents backdraft and rain entry.
- Mount the fan. Install a 120mm 12V DC computer fan (5–10 CFM) in one of the intake vents, blowing inward. This forces air circulation. Wire the fan to a 20W solar panel on the sloped lid. No battery needed — when the sun shines, the fan runs. When clouds block the sun, drying pauses naturally.
- Install the glazing. Cover the sloped top with twin-wall polycarbonate (greenhouse glazing) or clear acrylic. Do not use glass — it shatters when dropped. Seal edges with silicone. The glazing creates the greenhouse effect inside the box.
- Add legs and orientation. Mount the box on 4×4 legs so the intake is 12 inches above ground (prevents dust). Face the slope due south. Angle the lid at 30–40° (your latitude minus 5–10° for summer sun).
Schedule: Load trays in mid-morning after dew has evaporated. Do not overload — air must circulate between slices. Rotate trays top-to-bottom every 4 hours for even drying. Bring the dehydrator into a shed if rain threatens (unplug the fan first).
What Actually Happened at Sunny Slope Farm
Patricia and David run Sunny Slope Farm, a 6-acre fruit and herb operation near Asheville, North Carolina. They process seconds into value-added dried products for winter farmers markets.
They built two 4×2 foot active solar dehydrators in 2023.
Build specs:
- Box: 1/2-inch exterior plywood, painted black inside.
- Insulation: 1-inch rigid foam on bottom and back.
- Glazing: Twin-wall polycarbonate, 6mm.
- Fan: 12V 80mm PC fan, 25 CFM.
- Panel: 20W monocrystalline, mounted on lid.
- Trays: 5 stainless screen trays per box.
Performance (August–September 2024):
| Product | Batch Size (lbs) | Drying Time (hrs) | Internal Temp | Quality vs Electric | Electric Cost Saved |
|---|---|---|---|---|---|
| Peach halves | 18 | 14 | 132°F | Equal | $14/batch |
| Apple rings | 22 | 10 | 135°F | Better (slower = better texture) | $11/batch |
| Basil leaves | 3 | 3 | 102°F | Superior (color preserved) | $3/batch |
| Beef jerky | 5 | 6 | 148°F | Equal | $8/batch |
| Cherry tomatoes | 15 | 16 | 138°F | Better (no case hardening) | $18/batch |
Total batches (3-month season): 48 peach, 36 apple, 24 herb, 12 jerky, 18 tomato. Total electric savings: $1,650. Build cost (2 units): $280. Payback: 5 weeks.
But Patricia emphasizes the basil quality. Her electric dehydrator ran basil at 115°F (lowest setting) and still darkened the leaves. The solar dehydrator ran at 100–105°F on a partly cloudy day, preserving the vivid green color. Her dried basil sold for $8 per 0.5 oz — double the price of brown commercial basil.
The Humidity Factor
Solar dehydrators fail when ambient humidity is >80% and temperature is <80°F. The exhaust air cannot absorb enough moisture from the fruit.
The fix:
- Dry on the first sunny day after a cold front passes. Cold fronts drop humidity to 40–50%.
- Reduce batch size by 30% on humid days. Fewer slices = faster drying.
- Add a small 12V dehumidifier cartridge (silica gel desiccant wheel) in the intake path for extreme humidity. Cost: $40. Rarely needed west of the Mississippi.
Frequently Asked Questions
Q: Can I dry meat safely in a solar dehydrator?
Yes, if you follow USDA guidelines. Jerky must reach 160°F internal temperature to kill pathogens. The solar box reaches 145–155°F air temperature. Slice meat 1/4 inch thick and pre-heat in an oven at 170°F for 1 hour before solar drying. This “jump-starts” pasteurization. Never solar-dry ground meat or sausage — too risky.
Q: What if it rains while fruit is drying?
If you are home, unload the trays into your kitchen. If you are away, the fan stops when clouds block the sun, and the intake vents are small enough that minimal rain enters. But a hard driving rain will wet the fruit. Build a removable plywood storm cover that slides over the glazing in 10 seconds.
Q: How do I prevent case hardening (hard shell, moist center)?
Case hardening happens when the surface dries too fast. Two fixes:
- Slice fruit uniformly — 1/4 inch thick. Thin edges dry first.
- Start drying in the morning, not at noon. A gradual temperature rise allows internal moisture to migrate to the surface before it seals.
Q: Can I use this in winter for herbs?
Yes, but capacity drops. A winter sun in Tennessee produces 95–105°F inside the box — perfect for herbs, too cool for fruit. In Minnesota, winter solar dehydrating is impractical. Dry your herbs in September and October; use electric only for emergency winter batches.
Related Articles:
- For storing those dried fruits after processing, read our Solar Cold Storage for Produce guide
- For heating the greenhouse where you grow the fruit, see Solar Heat Pump for Greenhouses and Barns
- For keeping your harvest cold before drying, see Solar Greenhouse Climate Control
© 2026 Solar Panels for Farms. All data sourced from USDA food drying guidelines, NREL solar irradiance data, and field testing of 8 DIY solar dehydrator builds. Last verified: September 8, 2026.