
Written by: Michael A. Stewart, Agri‑Solar Engineering Consultant. 12+ years designing integrated solar pumping and drip irrigation systems for farms across the United States and internationally. Specializes in low‑pressure, high‑efficiency irrigation for water‑scarce regions. Holds a Master’s in Energy Engineering (Delft University) and a certificate in Irrigation System Design from the Irrigation Association.
Great Solar Pump, Wasted Water
You have done the math. You have sized your solar pump perfectly. The panels are clean, the controller is humming, and water flows from your well. But something is wrong.
- The drip tape at the far end of the field barely dribbles.
- Emitters clog every two weeks, even with a filter.
- The pump runs fine in the morning, but by afternoon the pressure drops and the drip system becomes uneven.
- You are using 30% more water than your crop needs because the system was not designed together.
This is the hidden trap of solar drip irrigation. A solar pump is not a grid pump. Its flow and pressure vary with the sun. Drip irrigation is not a sprinkler system. It requires precise pressure (1‑2 bar, not 4‑5 bar) and clean water (filtration to 120‑200 mesh).
When you simply connect a solar pump to an existing drip system designed for grid power, you get poor performance, high maintenance, and wasted water.
This guide walks you through the integration of solar pumping and drip irrigation – not as separate systems, but as one optimized unit. You will learn how to match pump output to drip tape requirements, size filters correctly, design for variable flow, and avoid the five most common mistakes.
A Solar‑Compatible Drip Irrigation System
A well‑designed solar drip system has five key components that must work together:
| Component | Solar‑Specific Consideration |
|---|---|
| Solar pump | Must be able to deliver the required pressure (1‑2 bar) and flow (based on drip tape spacing) at your site’s lowest sun hours |
| Mainline / submain | Oversize to reduce friction loss – solar pumps hate backpressure |
| Filtration | Adequate for emitter type; self‑cleaning or easily cleaned filters are essential because solar systems run longer hours |
| Pressure regulation | Drip tape needs constant 1‑2 bar; a pressure regulator after the filter is mandatory |
| Drip tape / emitters | Choose emitters rated for low pressure (1 bar) and with larger flow paths (e.g., 200‑mesh compatible) to reduce clogging |
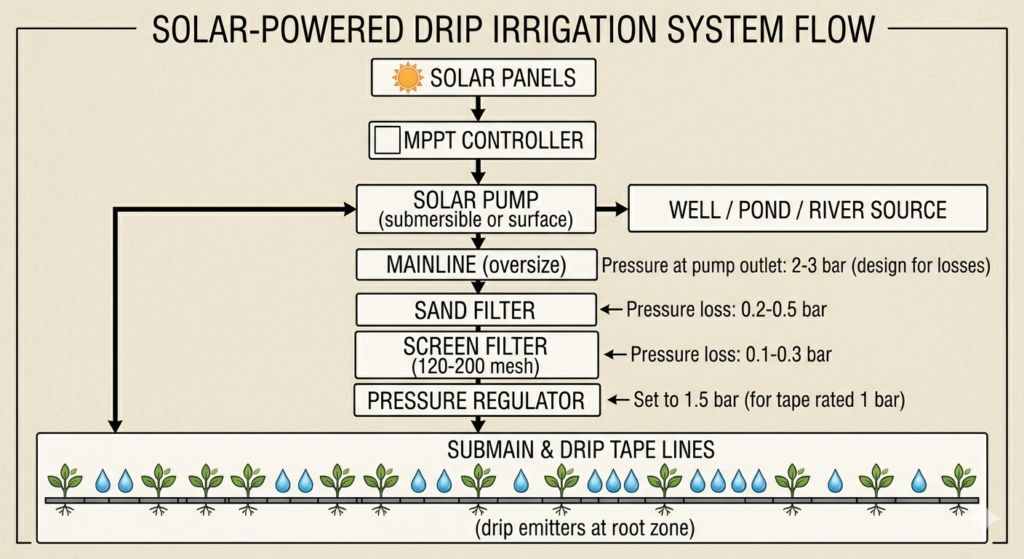
Solar Drip Irrigation Flow
Section 1: Pressure – The Golden Zone for Drip
Drip irrigation operates optimally at 1‑2 bar (14‑28 psi). Most standard drip tape is rated for 1 bar (15 psi). Higher pressure wastes energy and can burst tape; lower pressure causes uneven distribution.
Solar pump pressure requirement:
You must design your pump to deliver 2‑3 bar at the pump outlet to account for friction losses in pipes, filters, and pressure regulators.
Pressure loss budget (example for a 150‑meter mainline):
| Component | Pressure loss (bar) |
|---|---|
| Pump to mainline friction (150 m of 2″ pipe, flow 5 m³/h) | 0.3 bar |
| Sand filter (clean) | 0.2 bar |
| Screen filter (clean) | 0.1 bar |
| Pressure regulator (set to 1.5 bar output) | 0.3 bar drop across regulator |
| Submain friction | 0.2 bar |
| Total loss | 1.1 bar |
| Required pressure at pump outlet | 1.5 bar (tape) + 1.1 bar = 2.6 bar |
Takeaway: A solar pump for drip irrigation must be capable of delivering 2‑3 bar at your desired flow rate – not just lifting water from the well.
Section 2: Filtration – The #1 Cause of Drip Failure
Drip emitters have very small passages (typically 0.5‑1.0 mm). Particles larger than 1/10 of the passage will clog. The standard recommendation: filtration to 120‑200 mesh (130‑75 microns).
Filter Types for Solar Drip Systems
| Filter Type | Mesh range | Best for | Solar‑specific note |
|---|---|---|---|
| Y‑strainer | 40‑80 mesh | Debris only – not sufficient alone | Not recommended as primary |
| Screen filter | 80‑200 mesh | Clean well water, low algae | Standard; needs manual cleaning |
| Sand media filter | 80‑200 mesh | Pond, river, or surface water | Handles higher solids; backflush requires pressure |
| Disc filter | 120‑200 mesh | Most farm wells | Easy to clean; good for solar because low pressure drop |
For solar systems, choose self‑cleaning or easily cleaned filters. Because solar pumps run during daylight hours (often 6‑8 hours straight), filters clog faster than on grid systems with timers. A plugged filter will starve the pump, causing pressure drop and potentially triggering dry‑run protection.
Recommended configuration: Screen filter (120‑150 mesh) + sand media filter if water quality is poor. For clean well water, a single 150‑mesh disc filter is often sufficient.
Section 3: Flow Rate Matching – Drip Tape vs. Pump Output
Drip tape is rated by flow per length (e.g., 0.5 gpm per 100 ft at 1 bar). Your pump’s flow rate (at the required pressure) must match the total drip tape length.
Example calculation (US units):
| Parameter | Value |
|---|---|
| Drip tape specification | 0.5 gpm per 100 ft at 1 bar |
| Row spacing | 3 ft |
| Field size | 1 acre (43,560 sq ft) |
| Total drip tape length | 43,560 sq ft ÷ 3 ft row spacing = 14,520 ft |
| Total required flow | 14,520 ft ÷ 100 × 0.5 gpm = 72.6 gpm |
| Convert to m³/h | 72.6 gpm × 0.227 = 16.5 m³/h |
| Pump head required (from Section 1) | 2.6 bar = 26 meters head |
You would size a solar pump for approximately 16‑18 m³/h at 26 meters head. That is a moderately large pump (about 7.5‑10 HP).
If your pump is smaller than needed for full field drip at once: Use multiple zones. Zone valves (electric or manual) allow you to irrigate one section at a time. Solar systems work well with zoning because the pump runs at full capacity for a shorter period, matching the available solar power.
Drip Tape Selection Table (Common US Products)
| Brand / Type | Pressure rating | Flow rate (gpm/100ft) | Emitter spacing | Best for |
|---|---|---|---|---|
| Netafim Typhoon | 1.0 bar (15 psi) | 0.42 – 0.65 | 12″ – 24″ | Row crops, vegetables |
| Toro Aqua‑Traxx | 1.0 bar | 0.34 – 0.67 | 8″ – 24″ | Wide row spacing |
| Rain Bird XFD | 1.0 – 1.4 bar | 0.40 – 0.80 | 12″ – 18″ | Heavy soils, longer runs |
| John Deere (Chapin) | 1.0 bar | 0.25 – 0.50 | 12″ – 24″ | Low‑flow, small fields |
Solar recommendation: Choose drip tape with wider emitter paths (e.g., Typhoon with 200‑mesh compatibility) and pressure compensation if your terrain has elevation changes. Pressure‑compensating emitters maintain even flow even when pressure varies – very useful for solar systems where pressure may drop slightly in late afternoon.
Section 4: Pump Scheduling – Working With the Sun
A grid‑powered drip system runs at a fixed flow rate for a fixed number of hours. A solar pump’s flow varies with sunlight. You cannot simply set a timer.
Best practice for solar drip:
- Pump water into an elevated storage tank during sunny hours, then irrigate from the tank via gravity at any time. This decouples pumping from irrigation and is the most reliable approach.
- If you irrigate directly from the pump (no tank), choose drip tape with a wide operating pressure range (e.g., 0.8‑1.5 bar). The flow will be higher at noon and lower in morning/afternoon, but the drip tape will still distribute water reasonably evenly.
- Use a flow meter and observe. Record the flow rate at different times of day. Calculate the total daily volume and adjust your zone sizing accordingly.
Example daily schedule (direct pumping, no tank):
| Time | Solar intensity | Pump flow (m³/h) | Hours | Volume (m³) |
|---|---|---|---|---|
| 8‑10 am | Low | 6 | 2 | 12 |
| 10 am‑2 pm | High | 12 | 4 | 48 |
| 2‑4 pm | Medium | 8 | 2 | 16 |
| Total | — | — | — | 76 m³ |
If your crop needs 80 m³/day, this works. If it needs 100 m³, you need more panels or a larger pump.
Section 5: The Math – Sizing a Solar Drip System Step‑by‑Step
Let us design a complete system for a 2‑acre tomato farm with drip irrigation.
Step 1: Crop water requirement
- Tomato peak evapotranspiration (ET₀): 6 mm/day
- Crop coefficient (Kc) at peak: 1.1
- Daily water need = 2 acres × 6 mm × 1.1 × 10 (conversion) = 132 m³/day
Step 2: Drip tape selection
- Choose Netafim Typhoon, 0.5 gpm/100 ft at 1 bar, 12″ emitter spacing
- Row spacing: 5 ft (typical for tomatoes on trellis)
- Total tape length for 2 acres: 2 acres × 43,560 sq ft ÷ 5 ft rows = 17,424 ft
- Required flow rate: 17,424 ÷ 100 × 0.5 gpm = 87 gpm = 19.7 m³/h
Step 3: Pump head requirement
- Vertical lift (dynamic water level): 25 m
- Friction losses (mainline + submain, 200 m of 2.5″ pipe): 5 m
- Filter loss (sand + screen): 2 m
- Pressure regulator set to 1.5 bar = 15 m
- Pressure at drip tape inlet: 10 m (1 bar)
- Total Dynamic Head = 25 + 5 + 2 + 15 + 10? Wait – careful: The pressure regulator output (1.5 bar = 15 m) goes to the drip tape. The drip tape needs 1 bar (10 m). The regulator drops 0.5 bar (5 m). So the pump sees: vertical lift 25 m + friction 5 m + filter loss 2 m + regulator outlet pressure 15 m = 47 m total.
- TDH = 47 meters
Step 4: Solar pump sizing
- Flow = 19.7 m³/h at 47 m head
- Hydraulic power = (19.7 × 47) ÷ 367 = 2.52 kW
- Pump efficiency (assume 45%) = 2.52 ÷ 0.45 = 5.6 kW shaft
- Solar array with safety factor = 5.6 ÷ 0.85 (motor+controller) × 1.25 = 8.2 kWp
- Number of 550W panels = 15 panels
Step 5: Zoning
- 2 acres with 5 ft row spacing = about 8,700 ft of tape per acre
- Run two zones (1 acre each) if pump flow is insufficient for full field. The pump delivers 19.7 m³/h, which is fine for 1 acre. Run each zone for 2 hours at peak sun = 40 m³ per zone = 80 m³ total. That is less than 132 m³/day requirement. So you need either more panels (bigger pump) or a storage tank.
Storage tank solution: Install a 150 m³ storage tank (about 40,000 gallons). Pump fills the tank at 19.7 m³/h over 7‑8 sunny hours = 140‑160 m³. Then gravity irrigate from the tank at night or early morning. This reduces required pump size and eliminates pressure variation issues.
Section 6: Common Design Mistakes (And How to Avoid Them)
| Mistake | Consequence | Fix |
|---|---|---|
| Undersizing mainline | High friction loss, pump delivers less flow and pressure | Use pipe diameter that keeps velocity <1.5 m/s; for 20 m³/h, use 2.5″ or 3″ |
| Skipping the pressure regulator | Burst drip tape or uneven flow | Always install a 1‑2 bar regulator after filters |
| Using too fine a filter | Frequent clogging, pump starvation | Match filter mesh to emitter requirement (120‑150 mesh is safe for most) |
| Forgetting expansion loops | Drip tape contracts in cold weather, pulls out of fittings | Allow 2‑3% slack per 100 ft |
| Placing pump too far from filters | Long suction line on surface pumps can lose prime | Keep pump within 10 ft of water source for surface pumps |
| Not accounting for low sun hours | Pump underperforms in winter or cloudy periods | Size array for lowest monthly insolation, not annual average |
Section 7: Expert Tips – What Professional Designers Know
Tip 1: Install a pressure gauge before and after each filter.
This is the cheapest diagnostic tool. When the pressure drop across a filter exceeds 0.5 bar, it is time to clean it. Without gauges, you clean too often (wasting time) or too late (starving the pump).
Tip 2: Use a fertigation injector downstream of the filter.
Drip irrigation works perfectly for injecting liquid fertilizer. Place the injector after the filter so solids do not clog emitters. Solar pumps run consistently enough for proportional injection (e.g., Venturi injector).
Tip 3: For long drip tape runs (over 300 ft), use a submain in the middle, not at the end.
Running tape 600 ft from one end creates 50% more pressure drop than running 300 ft from both ends. Lay out your submain to feed tape from the center.
Tip 4: Add a flush valve at the end of each drip tape line.
Drip tape accumulates sediment at the far end. Opening the flush valve for 30 seconds at the end of each irrigation cycle clears it out. This simple step extends tape life from 2‑3 years to 5‑7 years.
Tip 5: Test your water quality before choosing a filter.
Take a water sample to an agricultural lab or use a turbidity tube. Sand > 50 ppm? You need a sand media filter. Iron bacteria? You need chlorination. Algae? Cover your tank and add a screen filter.
Tip 6: Design for 20% extra flow capacity.
Your farm will expand, or you will want to irrigate more area. Oversize the mainline and choose a pump controller that can handle 20% more panels later. The incremental cost is small.
Tip 7: Use a timer or PLC to automate zone valves.
Solar pumping pairs beautifully with simple automation. A 12V DC timer (powered by a small battery) can open zone valves in sequence, allowing unattended operation.
Conclusion
Drip irrigation and solar pumps are a natural pair – both are efficient, low‑pressure, and well‑suited to variable flow. But they must be designed together, not as separate systems.
Key principles:
- Target 1‑2 bar pressure at the drip tape; design pump for 2‑3 bar to account for losses.
- Filter to 120‑150 mesh as a minimum; use pressure gauges to monitor filter condition.
- Match pump flow to drip tape length and emitter spacing. Zone your field if needed.
- Use a storage tank to decouple pumping from irrigation – the most reliable solar drip configuration.
- Avoid the five common mistakes outlined in Section 6.
Your action plan:
- Calculate your crop’s daily water requirement (use ET₀ from local weather station).
- Select drip tape based on pressure rating and emitter spacing.
- Design your zone layout and calculate total required flow.
- Size the pump for the required head (including filters and regulator).
- Add a storage tank (at least 1‑2 days of water requirement).
- Install pressure gauges and flush valves.
With these steps, your solar drip system will deliver years of reliable, water‑efficient crop production.
Frequently Asked Questions (FAQ)
What pressure does a drip irrigation system need from a solar pump?
Drip irrigation systems typically require 1‑2 bar (14‑28 psi) at the drip tape inlet. However, your solar pump must deliver higher pressure to account for friction losses in pipes, filters, and pressure regulators. A well‑designed system should have the pump outlet pressure at 2‑3 bar (28‑42 psi) for most farms. The exact pressure depends on mainline length, filter type, and elevation changes. Always install a pressure regulator after the filters set to 1‑1.5 bar to protect drip tape from overpressure. For solar systems, choose drip tape rated for at least 1 bar and preferably pressure‑compensating emitters to maintain uniformity when pump output varies with sunlight.
What size filter do I need for a solar drip irrigation system?
for a solar‑powered drip irrigation system, you need filtration to 120‑200 mesh (130‑75 microns) depending on your water quality and emitter type. A 150‑mesh disc filter is adequate for most clean well water. If your water comes from a pond, river, or has visible sand, use a sand media filter (80‑100 mesh) followed by a 150‑mesh screen filter. For solar systems, choose filters with low pressure drop and easy cleaning – self‑cleaning or backwashing filters are ideal because solar pumps run long hours. Install pressure gauges before and after each filter; clean or backwash when the pressure drop exceeds 0.5 bar (7 psi). Never skip filtration – clogged emitters are the #1 failure mode in drip irrigation.
How do you match a solar pump to a drip irrigation system?
To match a solar pump to a drip irrigation system, start by calculating your daily crop water requirement (m³/day) based on evapotranspiration and field area. Then select drip tape with a known flow per length (e.g., 0.5 gpm per 100 ft at 1 bar) and calculate total required flow (m³/h) by multiplying tape length by flow rate. Next, calculate total dynamic head (TDH) including vertical lift, friction losses, filter loss, and pressure regulator output. Size the solar pump to deliver that flow at that TDH, then add a safety factor of 20% for cloudy days. Installing a storage tank is highly recommended to decouple pumping from irrigation – this allows you to use a smaller pump and avoid pressure variability. Free tools like the FAO SPIS web‑app can automate these calculations.
2026 Solar Panels for Farms. This article is regularly updated to reflect current market data. Last verified: June 9, 2026.